Presenting Molecular Views from
FirstGlance in Jmol

Updated March, 2026.


Quick Start: 

Sample Slides
With Animations
.

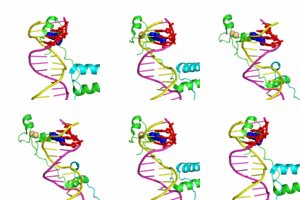
Rocking or spinning animations of views in FirstGlance can be made with easy methods built-into FirstGlance and described in this document. See examples at tinyurl.com/movingmolecules. Further adjustments of playback speed and addition of other enhancements can be made using OnlineGIFTools.


Complete Details
  1. Static Snapshots
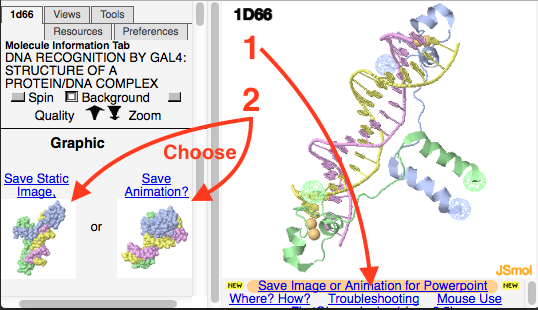
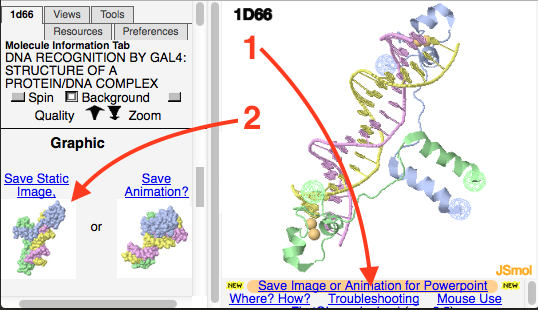
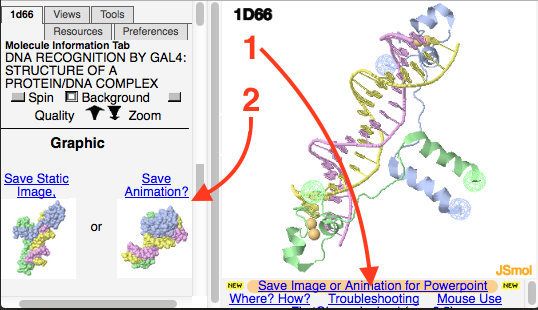
    1. Method 1: FirstGlance Can Save Static Images: Easiest, any size.
    2. Method 2: Capture A Screenshot.
    3. Method 3: Static Image from Polyview-3D.

  2. Rotating Views
    1. Method 1: FirstGlance Can Save Presentation-Ready Animations.
    2. Method 2: Use the Animation Kit from FirstGlance.
    3. Method 3: Make A Presentation-Ready Animation with Polyview-3D.
    4. Method 4: Project FirstGlance Itself.
    5. Method 5: Project Proteopedia.Org.

  3. Complex Videos can be captured using methods described separately. See Examples.

  4. Browser Compatibility for Saving Images and Animations from FirstGlance.
  1. Static Snapshots:   (See below for presenting Rotating Views)

    It is easy to put any molecular view from FirstGlance in Jmol into a presentation or document (Microsoft Powerpoint or Word, Google Slides or Docs, Libre Office, etc.).

    1. Method 1: FirstGlance Can Save Static Images.
      • Pros:
        • Easiest method.
        • Image defaults to the size of JSmol, but can be set larger (or smaller): 50 to 5,000 pixels.
      • Cons:
        • None that we know of.

      • Method:

    2. Method 2: Capture A Screenshot.
      • Pros:
        • Easy.
        • If you can see the molecule, you can capture an image (from any website, any browser).
        • Works from Proteopedia.Org, where molecular scenes can be customized easily.
      • Cons:
        • You might forget to depress the Quality button in FirstGlance or Proteopedia before capturing.
        • Image cannot be larger than your screen, or smaller than the browser will go.

      • Method:

        1. Use High Quality! Set Jmol to render in high quality:
          • You will be automatically reminded if you forget to depress the Quality button (near the Spin button) in FirstGlance in Jmol.
          • In Proteopedia, turn on the quality switch below the molecule. Also you may want to use the popup button to make a larger (resizable) image before capture.

        2. MS Windows (7 and later) include a convenient screenshot tool called Snip or Snipping Tool. Click Start, then type snip in the search slot in the Start Menu. The rest is self-explanatory. But here are instructions.

        3. MS Windows XP or earlier: Alt-PrtSc (hold down the Alt key, then press the Print Screen key) copies the active window to the clipboard. You can then paste the image into another application (such as Powerpoint).

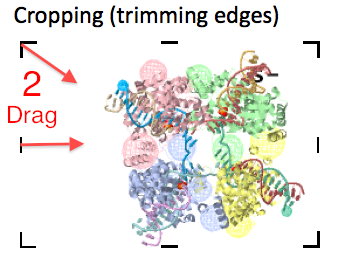
          • Cropping an image dropped or pasted into MS Powerpoint or MS Word: Click on the pasted image, then click on Picture Format that appears at the very top right. It includes a cropping tool: click on to activate cropping. Edge markers will appear on your pasted image. Drag these to delimit the new cropped image. Click the cropping tool again to de-activate it. Now you can resize the image (with the corner handles) and drag it to the desired position.
        4. Mac OSX:
          • Clipboard: Hold down Command (Apple) plus Shift plus Control (yes, 3 keys all at once!), and then press the "4" key. Now, use your mouse to click and drag a rectangle around what you want to save. When you release the mouse, the image will be saved to the OS X Clipboard. Now you can paste it into Word, Powerpoint, etc.

          • Saving an Image File: Hold down Command (Apple) plus Shift (just 2 keys), and then press the "4" key. Now, use your mouse to click and drag a rectangle around what you want to save. When you release the mouse, the image will be saved directly to a disk file (in Portable Network Graphics or .png format) on your desktop. This file can be displayed in a web browser, inserted into a Powerpoint slide, etc.

    3. Method 3: Static Image from Polyview-3D.
      • Pros:
        • You can customize rendering and coloring of the molecule.
        • Image will be best publication quality, created by PyMOL (but you don't have to install or license PyMOL!).
        • Image can be any size.
      • Cons:
        • Not as easy. Involves learning a new set of controls for rendering and coloring.
        • Many views in FirstGlance are not easily obtained in Polyview-3D (and vice versa).

      • Method: Please see below.


  2. Rotating Views

    1. Method 1: FirstGlance Can Save Presentation-Ready Animations.

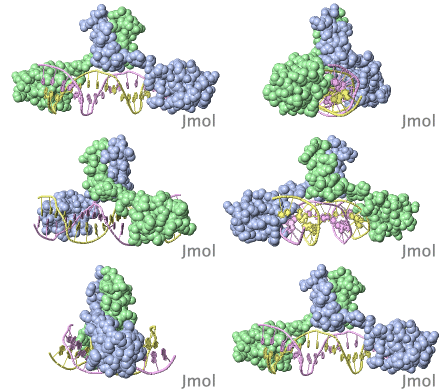
      Presentation-ready animations will move in Microsoft Powerpoint, Google Slides, Libre Office, or web pages. (These are multi-GIF files.)

      Here are example slides showing animations saved from FirstGlance:
      Google Slides.
      Download Examples in Powerpoint.

      • Pros:
        • Extremely easy to make from FirstGlance.
        • Can rock back and forth, or spin 360°, around the Y or X axis.
        • In most cases, takes only 1-3 minutes after you submit the request to generate the multi-GIF animation file.
        • FirstGlance can animate customized molecular scenes from Proteopedia.Org. Instructions.
      • Cons:
        • Maximum size of animations is limited, especially for full 360° rotations. For larger animations, use the Animation Kit below.
        • Usually works without fuss, but fails with an error message if another job happens to be running when you submit yours. Classes should not submit jobs all at once! Fails if you re-submit exactly the same job. (You must change the browser window size slightly, or rotate the molecule slightly, before re-submitting.) As an alternative, see the Animation Kit below.
        • Cannot animate morphs or complex transitions. Can only rock or spin a single molecular scene.

      • Method:


    2. Method 2. Animation Kit from FirstGlance.
      After downloading the Animation Kit, you save a view-file (pngj) from FirstGlance, drop it into the Jmol application, and generate the animation GIF file by dropping ready-to-use script files into the application.
      • Pros:
        • Make larger, high-resolution animations. (These files are large and will increase the size of Powerpoint file accordingly.)
        • You avoid the occasional error message failures of Method 1, and animations are generated faster.
        • You can control the speed of rotation.
      • Cons:
        • You must learn a few easy steps (explained in the Instructions), and install Java (easy).


    3. Method 3. Presentation-Ready Animations from Polyview-3D.

      Powerpoint-ready animation made with Polyview-3D. Click animation to ENLARGE.


      See Powerpoint® Examples of Molecular Animations made in PolyView-3D

      • Pros:
        • You can customize rendering and coloring. In contrast, FirstGlance offers a limited set of canned renderings and color schemes.
        • Images are slightly higher quality than images/animations from FirstGlance. This is because Polyview-3D generates images using PyMOL (but you don't have to install or license PyMOL!).
        • Morphs can be animated in addition to rocking or spinning. See example in the last slide of the demonstration set linked above.
      • Cons:
        • Involves learning a new, but easy, interface. You must generate the desired molecular scene using the controls at Polyview-3D. You cannot import a scene from FirstGlance into Polyview-3D.
        • Many views in FirstGlance are not easily obtained in Polyview-3D, and vice versa.
        • Once you submit your animation request to Polyview-3D, you may have to wait an hour (sometimes more) for the file to be generated, especially for larger animations with smooth rotation.

      • Method:
        • Follow instructions at Polyview-3D.
        • After the completed animation appears in the browser, right-click and Save Image As.
        • Drag and drop the saved GIF file into your Powerpoint® slide.

      • ConSurf: Polyview-3D can also make static or rotating views colored from ConSurf results. One slide in the demostration slides linked above shows a protein colored by evolutionary conservation with ConSurf.
        1. At your ConSurf results page, download the PDB file with ConSurf conservation grades in the temperature field.
        2. At Polyview-3D, under Source of Structural Data, use the Choose File button to upload your ConSurf PDB file.
        3. Under Chain Color and Rendering, enter the one-character chain name, and change the color scheme to Conservation. (You will probably also want to set the rendering to spacefill.)
        4. Under Advanced Structure Annotation, check Functional regions from ConSurf.
        5. Click Preview.
        6. You may use the Image Settings (for example to make a larger image) and the Animation Settings (for example to make the molecule rock back and forth in a Powerpoint slide).
        7. Click Submit to obtain your result.

    4. Rotating Views Method 3: Run FirstGlance during your presentation.

      Running FirstGlance during your presentation is a powerful method for including rotatable, molecular views in a presentation. You have all the views and tools of FirstGlance at your disposal. To make sure FirstGlance is available during your presentation, bookmark multiple URLs from multiple servers: see Mirror Sites.

      If most of your presentation is in Powerpoint, you would need to pop the FirstGlance browser window in front to show rotating molecular views, then pop Powerpoint back in front afterwards. This method requires a reliable Internet connection when projecting your presentation.

      ConSurf results: Consider downloading your ConSurf result(s) so you can guarantee that you have it, even it it gets removed from the server before your presentation. With this method, you can show a ConSurf result exactly as it was first shown to you by the server.

    5. Rotating Views Method 4: Proteopedia. At Proteopedia.Org, you can create online customized interactive molecular scenes in Jmol, complete with descriptive text, and green links that display several different molecular scenes. The molecular scenes can be taken directly from FirstGlance in Jmol, following these instructions.

      One big advantage of creating molecular scenes in Proteopedia is that they are immediately online for everyone to see and share. Normal pages in Proteopedia can be edited by anyone (as they can be in Wikipedia). However, you can make protected pages in Proteopedia that only you can change. See Help:Protected Pages.

      Another big advantage of creating molecular scenes in Proteopedia is that they are truly interactive -- they can be rotated and zoomed with a mouse.

      A third big advantage of showing molecular scenes in Proteopedia is the popup button under every molecular scene. This opens a new, resizable window containing only Jmol with the molecular scene. You can make it as large as you want, then rotate or zoom it.

      ConSurf results can be displayed in Proteopedia as well. Some Proteopedia pages titled with a PDB code have a section Evolutionary Conservation where you can check a checkbox to color each amino acid by its conservation level. An example is 2vaa. If you run your own customized ConSurf job, follow these instructions to display your result from a green link in Proteopedia.

      If you prefer to create molecular scenes from scratch within Proteopedia, you can use its built-in Scene Authoring Tools. These are so easy that college students routinely use them for class assignments. See Adoptions in College and University Classes.


  3. Complex Videos can be captured using methods described separately. See Examples.


    Suggestions for clarification or improvements are always welcome.
    Feedback to